Hey girl, if you’re drowning in a sea of toys like I was last year with my niece crashing at my place every weekend, DIY toy storage for beginners is your new best friend. Picture this: tiny Legos underfoot, stuffed animals everywhere – total chaos. I’ve been there, stepping on those sharp surprises at midnight.
I put this roundup together because I finally tackled my own toy explosion with super simple hacks that anyone can do – no fancy tools required. Last summer, I grabbed some dollar store bins and turned a messy corner into something magazine-worthy. It saved my sanity, and honestly, it was kinda fun.
Stick with me through these 25 top DIY toy storage for beginners ideas, and you’ll snag easy projects to reclaim your space. You’ll walk away inspired, with zero overwhelm. Promise.
25 DIY Toy Storage Ideas for Beginners That’ll Tame the Toy Chaos
Corner Plastic Drawer Stack
This stack of clear plastic drawers is genius for small spaces – just slide ’em into a corner and label by toy type. I did something similar in my guest room, and it took me 10 minutes with stickers from the craft aisle. Keeps everything visible so kids actually put stuff back. No more digging for that one missing puzzle piece.
Simple Stacked Wooden Boxes
Stack thrift-store wooden crates like these against a wall for instant open storage – paint ’em if you want flair. You can totally DIY this with leftover boxes from moving. I stacked three in my hallway once; held all the cars and blocks without toppling.
Classic White Toy Chest
A basic white toy chest on the floor screams easy beginner win – lid keeps mess hidden. Grab one cheap online or upcycle an old trunk. My friend did this and her kid loves “helping” tidy up now.
Wall-Mounted Bin Magic
These overhead bins in a playroom free up floor space big time. Screw ’em into studs with basic hardware – super straightforward. I tried wall bins in my craft area first; toys next. Game-changer.
Colorful Jar Organizers
Mason jars on a tray hold pencils and small animals perfectly – glue ’em down if needed. Dollar store jars, done. I use these for my niece’s art supplies; she sorts by color herself now. Adorable and functional.
Road Rug Toy Lineup
Line up cars on a black road rug with edges for “parking” – no build required. Roll it out, toys stay put. My nephew lines his trucks here every visit; pretend play leveled up.
Shelved Toy Car Display
Wooden shelves showcasing cars like a mini garage – kids see everything. Hang with brackets; easy peasy. I built one from scrap wood – wobbly at first, but superglue fixed it quick.
Lego-Filled Double Shelves
Two shelves stacked high for Legos and bits – sort by size. IKEA hack potential here. When I sorted my stash like this, building sessions got way less frustrating. You gotta try it.
Book-Filled Rocking Chair
Stuff a rocking chair with books for cozy storage – whimsical touch. No tools, just pile ’em in. I did this temporarily during a move; surprisingly sturdy for paperbacks.
Kid Room Pegboard Wall
Pegboard walls customized for toys – hooks for everything. Paint it fun colors first. My first attempt used kitchen pegboard; held dolls and trucks like a champ. Endless tweaks.
Craft Supply Wall Bins
Wall of bins for crafts and small toys – over-the-door style works too. Clip on with adhesive if drilling scares you. I mounted these above my desk; markers never wander now. Little win, big relief.
Floor-Level Toy Zone
Toys corralled near the couch in open bins – living room friendly. Woven baskets add style. During family game night, this setup kept chaos contained. Highly recommend.
Wall-Mounted Car Shelf
Floating shelf for toy cars – mount low for little hands. One screw per bracket. I hung this in a closet first; expanded to playroom. Kids park ’em perfectly.
Bedside Stuffed Animal Shelf
Shelves over the bed for stuffies – bedtime access easy. Tension rods if renter. My niece sleeps better with favorites nearby; sweet dreams guaranteed.
Open Playroom Shelves
Simple shelves in a kid’s room – toys galore organized. Stack bins inside. I assembled mine with a wonky level; still stands strong after a year.
Basket Shelf Lineup
Baskets on a shelf for mixed toys – swap as needed. Thrift finds shine here. You can label with washi tape for cuteness.
Lego Floor Play Station
Low table or mat for Lego builds with edge storage. Mats roll up clean. I made one from cardboard; lasted weeks before upgrade. Kid-approved.
Built-In Lego Unit
Custom unit on the floor for blocks – pull-out drawers optional. Plywood base easy. My DIY version used melamine; wipes clean from spills. Practical magic.
Vertical Lego Shelves
Tall wooden shelf for sorted Legos – gravity helps stacking. Nail it together basically. I sorted colors here; builds faster now. Obsessed.
Stacked Toy Truck Garage
Stack crates as a truck garage – drive-thru vibes. No glue needed. Nephew races ’em in and out; hours of fun contained.
Plywood Open Shelves
Cut plywood for doorless shelves – raw and rugged. Sand edges smooth. I braced mine with brackets; holds heavy toys fine. Budget hero.
Play Kitchen Cup Storage
Metal bin for pretend dishes – stackable joy. Raid recycling for bins. My setup sparks tea parties daily; dishes stay tidy-ish.
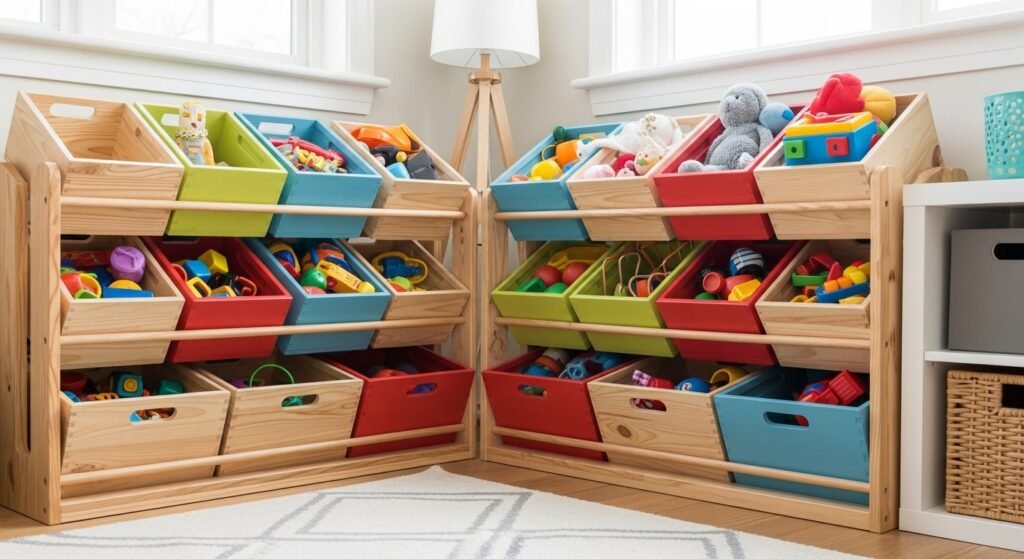
Colorful Toy Bins
Bright bins labeled by color – visual sorting for beginners. Stack or line up. I painted old ones; transformation was instant happy.
Ultimate Wooden Toy Shelf
All-in-one wooden shelf for everything – customize heights. Two-by-fours base it. Versatile for growing collections, trust me.
Blocky Bookshelf Storage
Bookshelf with blocks on lower shelves – dual purpose. Add dividers if messy. I tucked books behind; hidden gem for space. Perfect finisher.
How to Actually Make This Work For You
Start small, like pick one corner or shelf and tackle just that – I overwhelmed myself once trying the whole room, total fail, so trust the baby steps. Measure your space twice before buying bins or wood because nothing’s worse than stuff that doesn’t fit, and use painter’s tape to mock up shelves on the wall first. Label everything with big, fun fonts or pictures since kids respond way better to visuals than words, and rotate toys every few weeks to keep things fresh without adding more clutter. Oh, and involve the little ones – my niece “helped” paint bins and now she’s all about putting toys away. Quick wins build habits.
What’s the cheapest DIY toy storage for beginners?
Cardboard boxes or thrift crates painted up – under $10 total. Line with fabric scraps for polish. Lasts longer than you’d think.
Do I need tools for these ideas?
Nope, most use adhesive hooks or tension rods. Drill optional for sturdier shelves. Start no-tool versions to build confidence.
How do I get kids to use the storage?
Make it fun – labels with pics, low access, and play “clean-up race.” Praise goes far. They own it then.
Can renters do wall-mounted stuff?
Yes! Command strips or over-door hangers work great. No damage, easy remove. Test weight first though.